Sunday, February 28, 2010

OBIEE: Single/Detail Record View

Recently, I've been searching for a Single Row/Detail type report in Answers. Sadly, there isn't one so named.

Here's what I could find in Answers:

report types

Nothing jumps out at me, so, Twitter to the rescue again


Within minutes...I had an answer from Mr. Christian Berg. What was that answer? The Narrative View.

Here's the screen for the Narrative View:

narrative view screen

According to Mr. Berg, you reference the columns using the @1 (@2, @3, etc) syntax, the number representing the column number. So I tried that

narrative view with stuff

Run it...

not what I want

That's not what I want...

OK, so let's see if I can add some HTML to it. First I check the Contains HTML Markup box and then I enter in the following in the Narrative Text Area:
@1<br>

@2<br>
@3<br>
@4<br>
@5<br>
@6<br>
@7<br>
@8<br>
@9<br>
Here's what it looks like:

a better narrative look

Better, but not exactly what I want. Now that I know I can use HTML though, it should be very easy.

perfect!

Voila!

Random Things: Volume#16

EBS Challenge
John Piwowar wrote the first part of the EBS Installation Guide back in December, since then, it's become a runaway success. I hadn't realized how so until recently when I was looking at Google Analytics and it came it at number 19, for all time. Now it's up to 13 and with the addition of it to the front page, it should only go up faster.


I've never had a post that was this popular so I thought it fitting that John should get the recognition that he deserves. If you decide to take part and then write it up, let me know and I'll link you up to The EBS Challengepage. I think there are 4 people that have completed it so far. I'll even give you space here if you don't have your own blog.

Travel
Got the best color car ever this week.


OBI EE
For some reason my original, Learning Oracle Business Intelligence (OBIEE) post, has been near the top of the charts for multiple search phrases.
So I did what any sane person would do, I updated it with some new information. Not really sure if it's new, but it's got more. If people are finding it, I might as well update it as often as possible.

Friday, February 26, 2010

SOUG: SQL Developer with Syme Kutz

Tonight was the Suncoast Oracle User Group (SOUG) meeting with Syme (pronounced Sim-e, I thought it was Si-me) Kutz of Oracle presenting on SQL Developer, mainly the new Unit Testing functionality.

Unfortunately, I missed the first half of the meeting due to a flight delay, but from what I did see, it's very cool. If you read the announcement last week, you'll remember that Kris Rice had offered up (aka - threw under the bus) Syme. I made first contact and then passed the baton to our meeting coordinator who finalized the arrangement.

If you want to check out the Unit Testing features, you need the latest release (2.1), which can be found here. To access it, go to Tools --> Unit Testing

unit testing

I won't go into gory details simply because I need to use the dang thing first. I'm sure I'll have some posts in the near future.

Anyway, what I did see was pretty slick.

Syme then gave us some history of the product (developed originally by himself and Mr. Rice) and explained a bit more about some of the functionality. Many of you already know about the integration with APEX (I don't know much, other than it exists). That's about to be expanded and will give even more control over many aspects of APEX, including some pretty tight integration with the Unit Testing module.

One really cool thing that he mentioned, if you open up a trace file in SQL Developer, you get a pretty report for it. Apparently reverse engineered from tkprof.

First, find your trace file:

find trace file

Double click it to open it and you'll see something like this (you'll have to click through on this one):


I will break it down if you're too lazy though.

The first column of the report is the SQL:


Next up are the statistics:


Waits:


and finally Row Sources:


Pretty slick stuff.

Thanks Syme for coming down, hopefully we can get you down here again to show us the rest.

Wednesday, February 24, 2010

OBIEE: Create Repository Init Block

My post earlier today, OBIEE: Text File as Data Source , was the first part of my overall goal.

Here's what I'm trying to do. Due to certain restrictions in our environment, the tnsnames entries in our separate environments (Dev/QA/Stage/Prod) are exactly the same. I would prefer to have one entry in each environment that points to that environments database, but alas, I cannot. What this does is forces us to change the password in the connection pools when migrating. I know it's not ideal, but it is what it is.

The proof of concept I am embarking on will allow us to lookup the tnsname entry and the associated password for that environment, theoretically, requiring no changes between environments.

In that respect, it was decided that we would have a single service account. From that service account, we could look up the values we need for each environment. Here's the other fun problem...what comes first? The chicken or the egg? This service account password will be stored in a simple text file that will be locked down by the system administrators. Don't ask what happens when the password changes either. At this point, it's just a proof of concept. So be gentle. If you have an established way to manage passwords...please share.

We've pulled the text file into the RPD already. Now, I need to create 2 repository variables to hold these values. I open up the Administration tool, go to Manage then variables. You should see this:

variable manager

Then follow this picture to create a new Initialization Block

create init block

Name your Initialization block init_block_test

big picture

Leave the scheduler stuff alone for now, click on Edit Data Source

some funny caption goes here

First, browse for the connection pool

kthxbi

Select the get_local_password (yes, the name mysteriously changed from the default Connection Pool to "get_local_password," it makes sense doesn't it?).

teh tubes!

In the Default Initialization String text box, enter:
SELECT username, password 
FROM test.txt
You can test it if you want, but I'm saving it for the final step.

Your Initialization Block Data Source should look like this

bollocks

Now select Edit Data Target

edit variables

Which looks like this

add block variable target

Select New and enter INIT_USERNAME in the Name text box and make the Default Initializer 'USERNAME' (in single quotes).

init username variable

Do the same thing for the password column, INIT_PASSWORD and 'PASSWORD'

Now you are back at the main screen and the Test button (lower left hand corner) should be enabled. Select it.

test results

One final test...let's see if we can access these in the presentation layer.

success!

So it's a success right?

After I was done, I began to think..."You can access the repository variable from the presentation server"

Ummm...that's not good. Double checked the properties of both the Initialization Block and the Variables to see if there's a way to lock it down...and there's not. Because of this "small" little security issue, I'm not completely sold. It is a proof of concept, perhaps it should stay there.

OBIEE: Text File as Data Source

I have a requirement to pull data from a text file. OBI has the ability to pull from (just about) any database, but can it pull from a text file? Of course.

First I'll create a simple file, call it test.txt. In the file I put
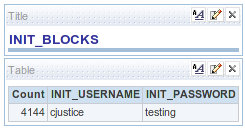
cjustice testing
that "space" between cjustice and testing is actually a tab character (usually represented as -> if you have view formatting turned on). Knowing that it is a tab will be important shortly. Save the file to your root folder, i.e. c:\test.txt

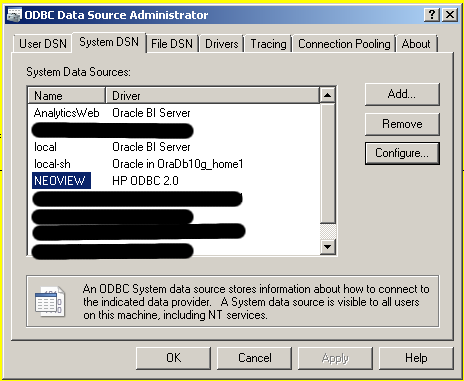
Next up, go to your ODBC Datasources:

Control Panel --> Administrative Tools --> Data Sources (ODBC)

When that opens up, navigate to the System DSN tab and click on Add.

You'll be prompted to choose a driver, select the Microsoft Text Driver (*.txt, *.csv)
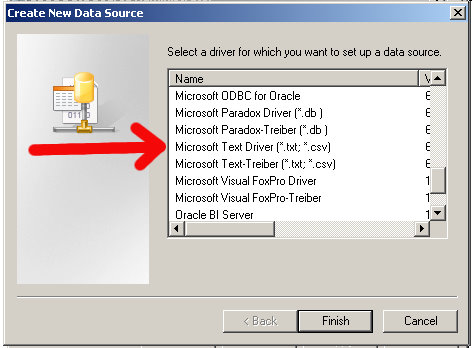
select driver

Click on Finish.

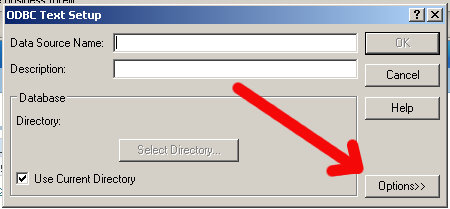
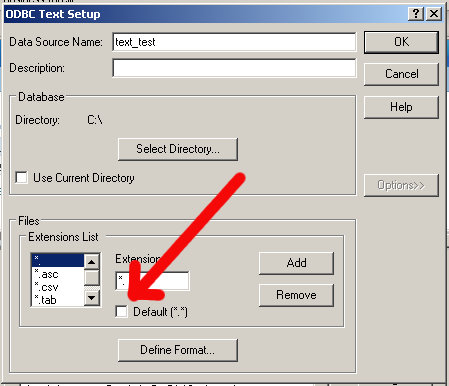
Next up, you should see the ODBC Text Setup screen, click on the Options tab to expand the window.

options tab

It should look like this:

odbc text setup expanded

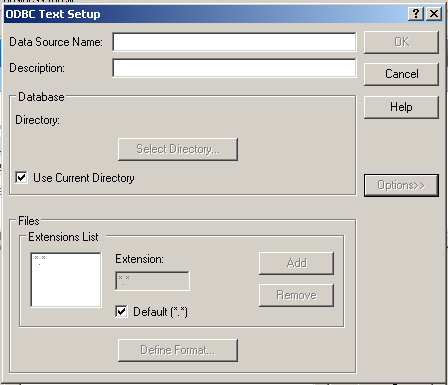
Uncheck the Use Current Directory checkbox (default is usually c:\windows\system32):

uncheck current directory

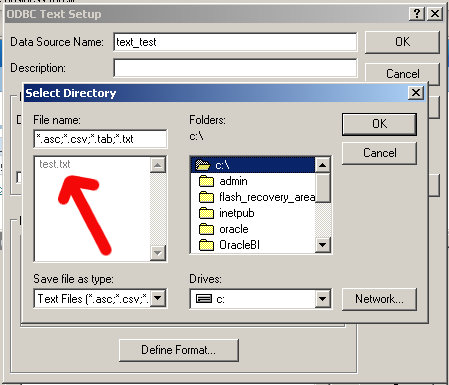
Then select the Select Directory button and navigate to your root folder, or the place where you saved the test.txt file. You should see your file, greyed out, in the left hand pane.

select directory

Now, at the bottom of the window, uncheck Default (*.*) which should enable the Define Format button

define format

Select the Define Format. For the Format drop down, choose Tab Delimited. Rows to Scan, in my case, will only be 1. You can leave it at the default if you want though.

After you have done that, the Guess button should be enabled for you, go ahead and click it.

define format step 1

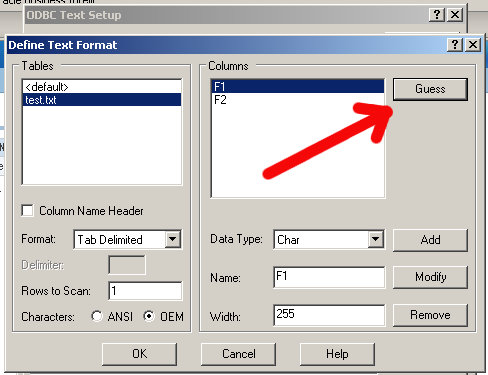
See F1 and F2? Those are your columns. Let's name them something meaningful so we can easily reference them later.

In the Name box, it says F1, enter in USERNAME and click on Modify (the button to the right):

modify column name

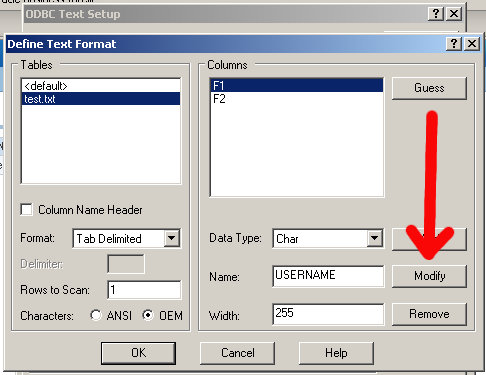
Do the same thing for the F2 column, name it PASSWORD.

It should end up looking like this:

final screen

Select OK and then select OK again in the ODBC Text Setup screen. You should now see your new data source in the System DSN window.

system dsn

OBI EE Admin Tool
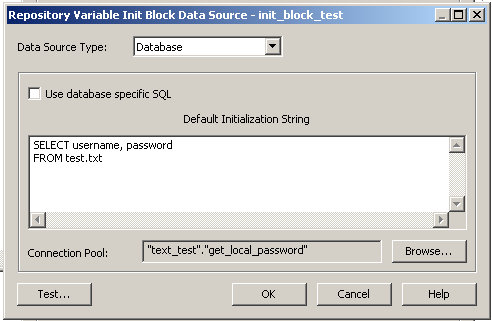
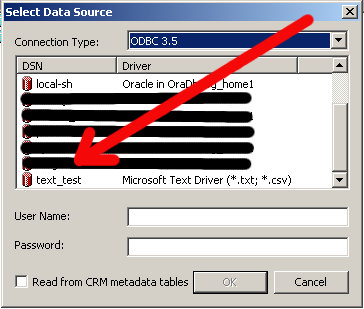
Now, we need to pull this new data source into the RPD. Open up your RPD, go to File --> Import --> from Database

You'll see this window, go ahead and select your new data source:

select data source

You'll be prompted with the Import window, expand the c:\ drive and then find your file

find file

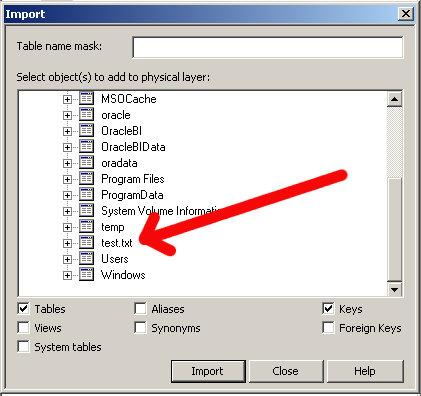
Select Import (at the bottom), wait for it to complete and then close the window. In your physical layer you should see a new "database" with the name "text_test" (or whatever you named your data source). Go ahead and expand that to see what you've got:

physical layer

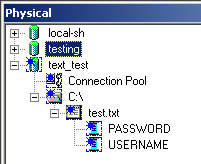
To verify, right click on the table "test.txt" and select View Data.
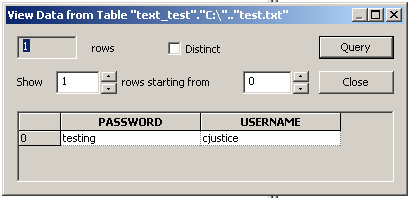
view data

All done.

Tuesday, February 23, 2010

Connect to HP Neoview using Heterogenous Services

Being the lazy sort that I am and not wanting to pay for a SQL client, I decided to use my local Oracle instance to access a HP Neoview database. Please don't ask me any questions about it, because like much of the world, I don't know either.

Hat(s) off to Tak Tang. I've used his guide a number of times throughout the years. If he blogs, I can't find it, so if you know about it, please link him up. The first time I used it was back in aught (sp?) 5 to connect to a DB2 instance.

Setup
Database (source): Oracle 10gR2
OS: Windows Vista Ultimate running as a VirtualBox Guest on Ubuntu
Database (target): HP Neoview 2.4 (or something)
OS: Doesn't matter

Materials
HP Neoview driver which can be found here. (Thanks Christian)

Steps
Download the HP Neoview driver and install it. Since it is windows, just click away accepting all the defaults.

Next, configure an ODBC Datasource. I won't go into the gory details, but it's pretty easy. When you are done, you should see something like this:

ODBC Datasource

Now comes the fun part.

In your <ORACLE_HOME>\hs\admin directory you should see the following:

HS Folder

Open up the inithsodbc.ora file and set the parameters as follows:
HS_FDS_CONNECT_INFO = NEOVIEW
HS_FDS_TRACE_LEVEL = 1
Save the file as initNEOVIEW.ora in the same directory.

Now traverse to <ORACLE_HOME>\network\admin and open up your listener.ora file. Add a SID_DESC so that your file now looks like this:
LISTENER=
(DESCRIPTION=
(ADDRESS_LIST=
(ADDRESS=(PROTOCOL=tcp)(HOST=localhost)(PORT=1521))
(ADDRESS=(PROTOCOL=ipc)(KEY=extproc))))
SID_LIST_LISTENER=
(SID_LIST=
(SID_DESC=
(GLOBAL_DBNAME=testing)
(ORACLE_HOME=c:\oracle)
(SID_NAME=testing))
(SID_DESC=
(SID_NAME=plsextproc)
(ORACLE_HOME=c:\oracle)
(PROGRAM=extproc))
(SID_DESC=
(SID_NAME=NEOVIEW)
(ORACLE_HOME=c:\oracle)
(PROGRAM=hsodbc)))
Reload or stop and start your listener.

Now open up your tnsnames.ora file and add an entry for NEOVIEW. It should look like this:
NEOVIEW =
(DESCRIPTION=
(ADDRESS_LIST=
(ADDRESS=
(PROTOCOL=TCP)
(HOST=localhost)
(PORT=1521)
)
)
(CONNECT_DATA=(SID=NEOVIEW))
(HS=OK)
)
The last step is to create a database link.
CREATE DATABASE LINK neoview
CONNECT TO "username"
IDENTIFIED BY "password"
USING 'NEOVIEW';
You should be all set now. You can test it out by issuing a simple
SELECT * FROM dual
If that works, you're done.

If you have problems, check out Tak's Troubleshooting section.

Monday, February 22, 2010

OBIEE: Call SAPurgeCacheByDatabase

So the reason I am investigating the ODBC Function extensions is that we are trying to tie this into our existing ETL process. After load, and within a designated time frame, we'd like to clear the cache for a given set of tables. Fortunately, all those tables exist in a single database. Unfortunately, I'm wasting your time by putting these into separate posts. :)

First, nothing up my sleeve.

cache is cleared

So you understand the mapping, I made a pretty picture for that (it's not readily available in the cache manager)

mapped RPD

I go off and run the reports (no need for screenshots of those).

Refresh the cache manager

cache full!

So now I have cache entries for both "databases" (in quotes because they are actually the same physical database, just 2 separate connections).

I then create the SQL file and put the following:
CALL SAPurgeCacheByDatabase( 'local-sh' );
Then I just follow the same procedure as SAPurgeCacheAll()
nqcmd -d AnalyticsWeb -u Administrator -p Administrator -s sapurgecachebydatabase.sql
The output is almost identical as well
-------------------------------------------------------------------------------
Oracle BI Server
Copyright (c) 1997-2009 Oracle Corporation, All rights reserved
-------------------------------------------------------------------------------

CALL SAPurgeCacheByDatabase( 'local-sh' )
-------------------------------------------------------------------------------
-------------------------------------------------------------------------------
------------------------------
RESULT_CODE RESULT_MESSAGE

-------------------------------------------------------------------------------
-------------------------------------------------------------------------------
------------------------------
1 [59118] Operation SAPurgeCacheByDatabase succeeded!

-------------------------------------------------------------------------------
-------------------------------------------------------------------------------
------------------------------
Row count: 1
-------------------------------------------------------------------------------
-------------------------------------------------------------------------------
------------------------------

Processed: 1 queries
And voila! The Sales cache has been cleared.

cache cleared!