(Yes, it is sad that I am writing this on New Year's Eve...I'm on a mission at this point and nothing will stop me).
So I've been trying to follow along with John's EBS Install series...and by trying to follow along I mean I'm still on step 0 (zero).
First, it was a lack of space. 300 GB to be exact. So I went out and bought a 320 Seagate expansion drive. I can't remember that far back, but I think other things came up and I had to requisition that space for other projects.
A couple of weeks ago, I found a 1 TB external drive (USB 2.0) for $100. Couldn't pass it up. Sweet...now I'm all set to do this thing.
Somewhere, somehow, I removed all the carefully managed installation files. Couldn't find them. So I started over. A quick reminder, it's 46.25 GB of download, which takes a total of about 8 hours...even with 25 Mbps down. I am really thankful that Kris Rice doesn't do EBS...he'd be in for a world of hurt.
OK, I'm downloading the files and unzipping them simultaneously...to save a little bit of time. Get everything downloaded and unzipped...this might be where the fun really begins.
If this is your first time, I'm using VirtualBox. The rest of the setup is like this:
-- Dell XPS M1530
-- Intel Duo Core T1555 1.83 Ghz
-- 3 GB RAM
-- 1 TB Seagate External Drive (USB 2.0)
-- Ubuntu Karmic Koala (9.10)
Not the most powerful machine in the world...but decent enough for 99% of everything. Of course by everything I mean everything but EBS.
The first time I created a 300 GB Dynamic HDD. That's the one I downloaded and unzipped all the files too. Upon completion, it had grown to 68.5 GB. OK, let's run it. Kick off the rapidwiz script, run through the first couple of screens and then it does a system check. Oops...there's not enough space. John did say that 350 GB would be preferable...I obviously didn't listen.
OK, so I could either expand that HD or shrink it and add another. Expansion is not possible (yet) in VirtualBox. I tried cloning (not sure why) and still ended up with a 300 GB disk of which 68.5 GB was used.
I then tried to use zerofree so that I could compact it (again, I have no idea why I was trying to do this). Those attempts were very unsuccessful because I couldn't figure out how to make the HD read-only. I did figure out a way later...just add a bad line in /etc/fstab and then you can run zerofree. What was the poing of compacting it though? No idea.
In one of the more recent versions of VirtualBox (I think 3.0), you could add a second HD. At least that's when I noticed that ability. So I created a new Dynamically-expanding 300 GB HD and attached it through the VirtualBox GUI.
Now I was stuck trying to figure out how to mount the stupid thing. Mr. Brad Tumy to the rescue.
Kick off the rapidwiz script, get through all the setup screens and it's installing...I left it over night...and one more night...78 GB had been written to disk.
I killed it.
How about just creating a 300 GB Fixed HD? Tried it...ran for 24 hours...about 60 GB had been created.
I killed it.
Maybe I could use Shared Folders. I consulting The Twitter and was reminded of my recent fun with Shared Folders.
Hmmm....How am I going to do this?
Then an IM with a colleague where he asked about The Cloud. It would be nice to have a test environment, as we are all remote, that we could share. I gave him 2 suggestions, I could buy a beefy machine and host it here at home or I (we) could try to do something in The Cloud.
That got me thinking...The Cloud? Hmmm...let's see if I can install OBIEE there.
I was immediately sold when I downloaded the OBIEE software (1.5 GB) in like 3 seconds (14 or 15 Mbps). I got OBIEE installed and running on Windows...but when I was creating the Instance, I noticed some pretty beefy boxes.
Maybe I could create the 300 GB VDI in The Cloud?
Yes, absolutely!
So I fired up a 20 ECU Windows Server Datacenter (2008?), with 8 dual core CPUs and 7.5 GB of memory. It took 2 hours to create the VDI.
Sweet!
Now...how in the hell am I going to get that 300 GB down to my machine? Since my local drive was attached, perhaps I could just drag and drop it there. Nope...didn't like that.
I'll zip it up!
Using 7zip, I was able to compress it to a very modest 360.9 MB. That's got to be close to a million percent compression right?
Downloaded that via IIS (had to set that up as well) and began to unzip it. First 5 GB took about 5 minutes, so I'm thinking 5 hours. Then it started to crawl. I was at 75 GB after 10 hours which was going to put me at 40 total hours. But it looked like it was exponential...that 40 hours probably would have ended up around 1 million hours. I don't have that kind of time.
I killed it.
Consulted The Twitter again.
@TedC and @jtdavies offered up some suggestions. @TedC told me to use Amazon S3. @jtdavies told me to split it up and use rsync.
Being incredibly impatient and quite possibly very stupid, I "split" the difference. Using my 400 GB attached Volume, I decided to use The File Splitter to split the files. 10 MB chunks. 3000 some odd files. No worries, I'll just zip up every 100 or so, download and unzip.
Until I ran out of room.
*%##@$!!~!@#$%#$#$**&%(*##@@!!!!!!!
Shoot me...now!
I created a second (well, third) volume, 315 GB, which would be the target for the split files. Attached it and began the split...again. This time, 10 GB chunks. I wasn't worried about the size as they compress very nicely. Two of those equals about 24 MB of download.
So I'm almost done with that...about 95% complete. I just have to download 2 more zipped files.
The funner part will be getting those put back together...if it's even possible. I've read up on cat, I just hope it comes through.
If you have any suggestions...or you want to come over to my house or remote into my computer and help me...that would be awesome! :)
Thursday, December 31, 2009
The EBS Challenge
I'm going to go ahead and say it, I believe John Piwowar's EBS series has been a success. I'm not talking in hits or those types of metrics because I haven't really analyzed the impact his articles have had. I'm talking about inspiring others to do the same. I believe that's where the real value has come from.
So far John has written 6 articles, 3 here and 3 companion pieces on his sites. He sent me the 4th last weekend (about an hour after the 3rd) which I will post next week (holiday lull here). He claims that's a record for him, 8 articles in a single month.
Anyway, here's the list of people who have decided to take the EBS Challenge:
I'm pretty sure I left people off this list. So if you know of anyone or are someone using John's install guides, let me know through the various methods of communication (twitter, comments, email, IM, etc). I'll add your name to the list with links and all...would be fun to see how many names we can get on here. If you did use the guide and would like to write up your experiences (I will be writing one myself) and post them here as a guest author, or you want to write it on your own blog, let me know. I'll add links next to your name pointing to your article. Also, there is no time limit either. If you follow the guide next December and would like to be added, I can do that too.
So far John has written 6 articles, 3 here and 3 companion pieces on his sites. He sent me the 4th last weekend (about an hour after the 3rd) which I will post next week (holiday lull here). He claims that's a record for him, 8 articles in a single month.
Anyway, here's the list of people who have decided to take the EBS Challenge:
- me - ever so unsuccessfully so far. This seems more to do with computing power than anything. You will see a future post on all the fun I have had.
- My EBS Install Saga (probably part I of many)
- My EBS Install Saga - Part II
- Ted Simpson [blog|twitter|guest author]
- Marcin Przepiorowski [blog|twitter]
- Floyd Teter [blog|twitter]
- TedC [web|twitter]
- McG - Install EBS R12 on a Scrapped Desktop PC? Yes It's Possible and Fun!
I'm pretty sure I left people off this list. So if you know of anyone or are someone using John's install guides, let me know through the various methods of communication (twitter, comments, email, IM, etc). I'll add your name to the list with links and all...would be fun to see how many names we can get on here. If you did use the guide and would like to write up your experiences (I will be writing one myself) and post them here as a guest author, or you want to write it on your own blog, let me know. I'll add links next to your name pointing to your article. Also, there is no time limit either. If you follow the guide next December and would like to be added, I can do that too.
Tuesday, December 29, 2009
Windows in the Cloud
Last January I read a post by Mr. Dan Norris (not the UK guy), I bought my own server for $1.02 (USD!). The title is fairly self-explanatory, he fired up an instance at (in?) Amazon's EC2, did what he needed to do then shut down (terminated) the instance. Cost? $1.02. It was the first real world application I had seen of the cloud.
Shortly after that, Mr. Lewis Cunningham [ blog | twitter ] went looking for volunteers to provide feedback on a cloud book he was writing. He wanted those with experience and those without (me). I jumped on the opportunity and Mr. Cunningham accepted. Thankfully, the book went by the wayside, instead becoming a series of articles (which I can't seem to find) on his blog, because I had fallen behind...way behind.
Since then I haven't done a thing in the cloud (should I capitalize that?). Until today when a colleague asked about creating a test bed for OBIEE, Essbase and other software. I prefer having a big beefy machine at home that I can muck around with, but seeing as how I haven't had a job in a while and money is tight, I thought the cloud would be the best bet.
So I began to tinker.
To back up a little, one thing I always had problems with was connecting to the instance via Ubuntu (not sure if this was a me/Ubuntu issue or a cloud/Linux issue)...by problems I mean I was never able to connect.
Since we are talking about OBIEE and it can be a Windows only install (both server and client tools), I tried to see what I could do. First I looked to see if there were any OBIEE images (AMIs) out there. There was, but I needed some sort of subscription to that. So I fired up my own Windows Server 2003 (64bit) instance, downloaded java (JDK) and the OBIEE software.
Small side note, download speeds from there are AWESOME!

I have 25 down and 15 up and home and I thought that was fast...we should really feel sorry for Kris.
How to Create an Instance using Amazon's EC2
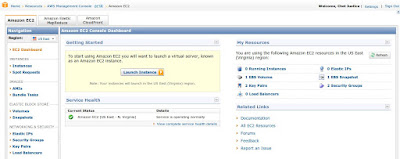
First you'll need to create an account if you don't already have one. Then go to http://aws.amazon.com/. Find the AWS Management Console and click on that. Should look something like this:
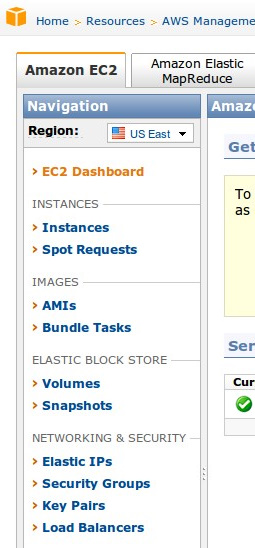
On the lefthand side, you'll see a menu of actions.
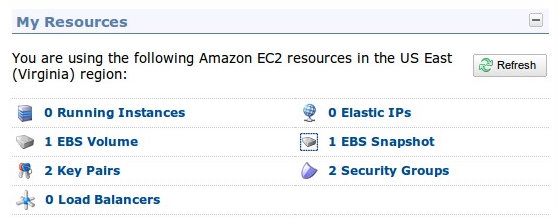
On the right side is your dashboard
Back to the left side, choose AMIs
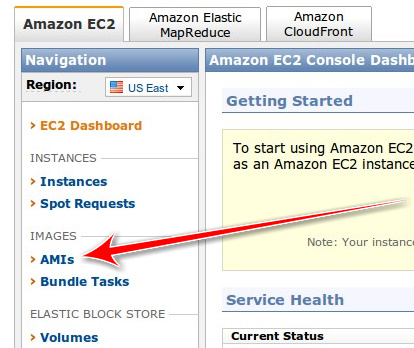
That should take you to this page

Let's find some images.
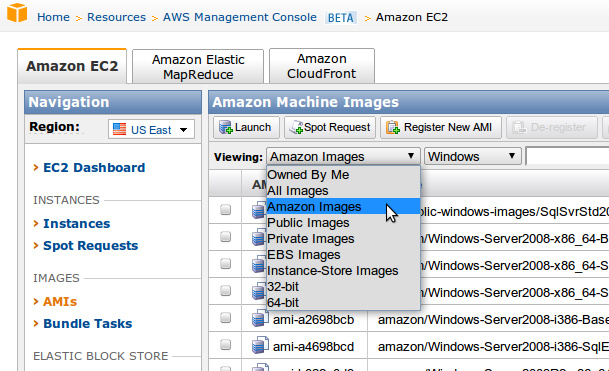
First, pull down this drop down and select Amazon Images
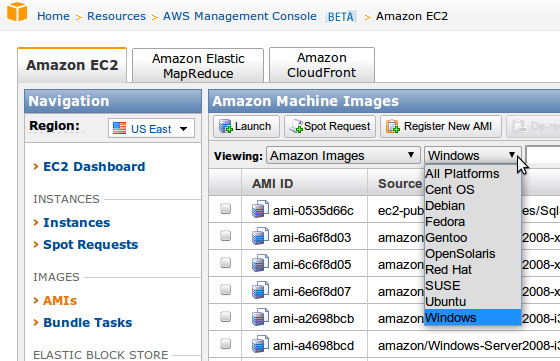
Then select your platform, Windows
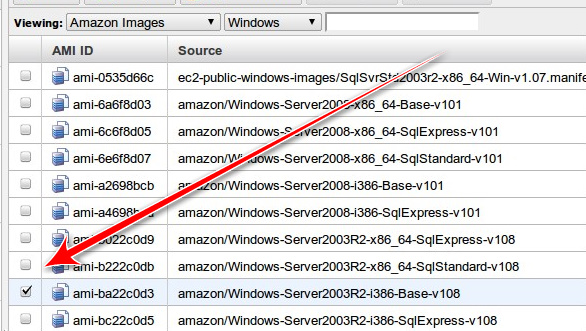
Select the amazon/Windows-Server2003R2-i386-Base-v108
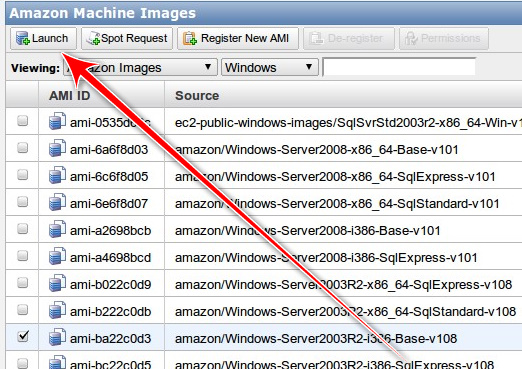
Launch it
This will bring up the Request Instances Wizard, just go ahead and select the default and click on Continue

Instance Details, I don't really know yet what this page is about, perhaps someone out there can enlighten me, but just go ahead and accept the defaults
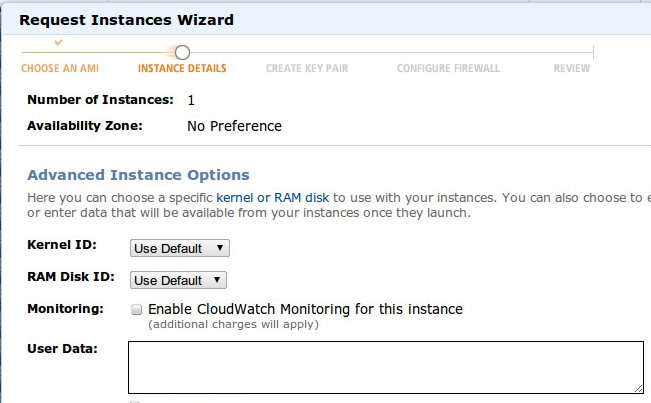
Now we're on the Create Key Pair page. I have a couple of keys created but I'll walk you through creating a new one as well.
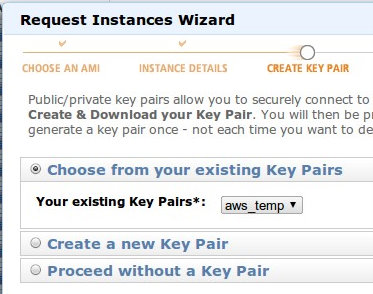
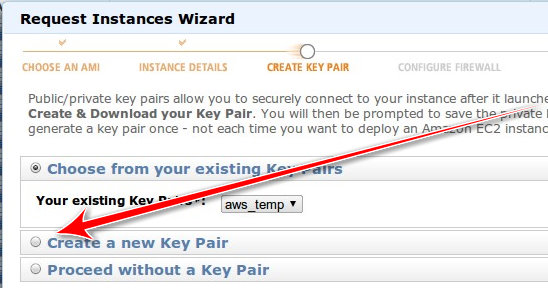
Select Create a new Key Pair
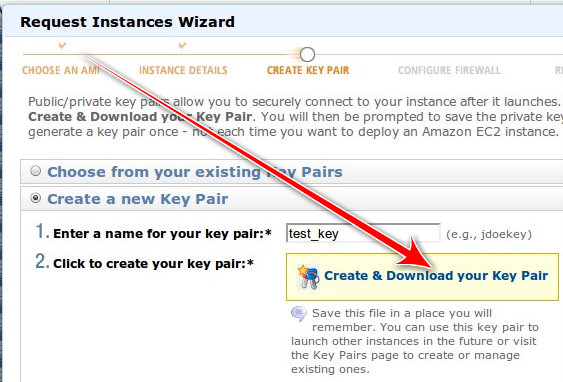
Name your new key "test_key" then select "Create & Download your Key Pair." Download the key to your Desktop.
Next up, Security Group. This is probably what screwed me up previously, trying to connect to Linux instance. I was never sure where the key should reside. I followed all the instructions...I just couldn't get it to work.
With Windows, you need to add a Security Group so that you can RDP into the machine. The port is 3389, but the wizard will take care of that.
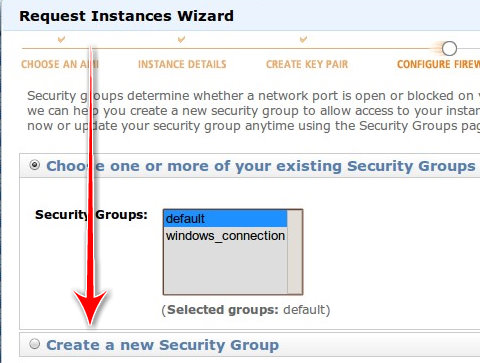
Name it whatever you want and down at the bottom, select RDP as the rule you want to add.
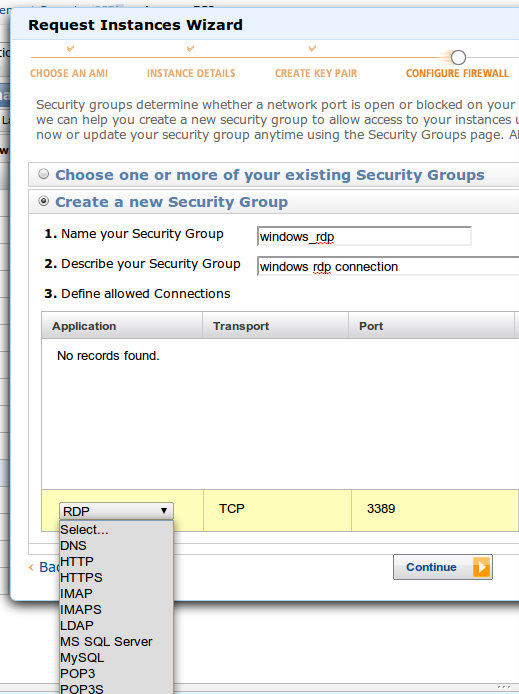
When you are done it should look something like this

Select continue and you get this nice little summary page
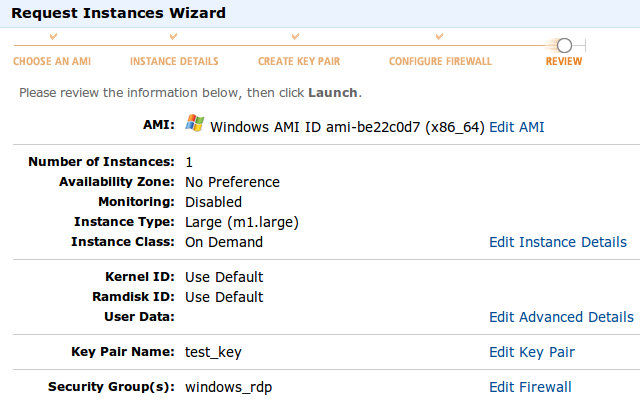
Click Launch.
Connecting to your Instance
It takes a few minutes for your server to start up. You may have to hit refresh in your management console to see it.
Once the instance has started up, you need to get the password. If you haven't waited long enough, you'll see this:

Be patient.
To retrieve your password go to Instance Actions
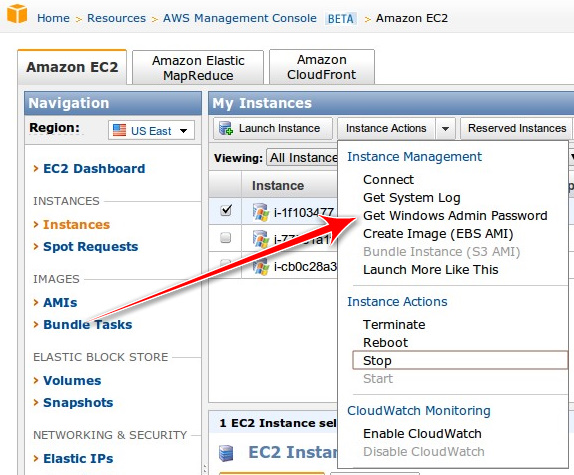
You'll be greeted with this
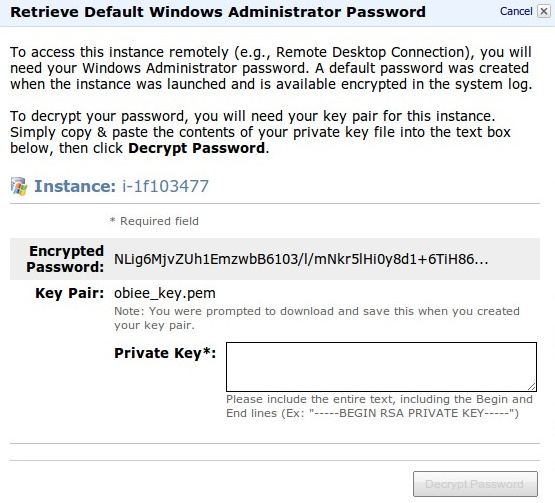
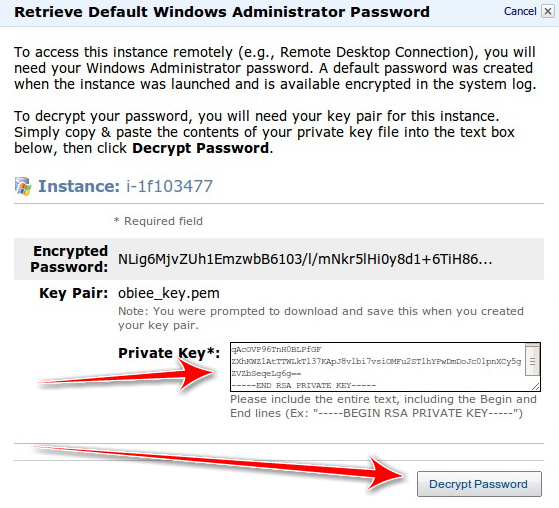
Enter the text from the key you downloaded to your desktop (note the screenshot says obiee_key, that's because I took this screenshot earlier today).
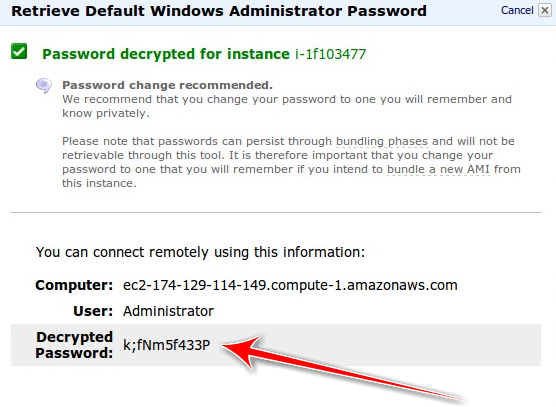
And here's your password
Now open up Remote Desktop Connection (Windows) or your Terminal Server Client (Ubuntu), enter in the address, Administrator for the username and password you just generated.
Hit connect and you should be done!
Shortly after that, Mr. Lewis Cunningham [ blog | twitter ] went looking for volunteers to provide feedback on a cloud book he was writing. He wanted those with experience and those without (me). I jumped on the opportunity and Mr. Cunningham accepted. Thankfully, the book went by the wayside, instead becoming a series of articles (which I can't seem to find) on his blog, because I had fallen behind...way behind.
Since then I haven't done a thing in the cloud (should I capitalize that?). Until today when a colleague asked about creating a test bed for OBIEE, Essbase and other software. I prefer having a big beefy machine at home that I can muck around with, but seeing as how I haven't had a job in a while and money is tight, I thought the cloud would be the best bet.
So I began to tinker.
To back up a little, one thing I always had problems with was connecting to the instance via Ubuntu (not sure if this was a me/Ubuntu issue or a cloud/Linux issue)...by problems I mean I was never able to connect.
Since we are talking about OBIEE and it can be a Windows only install (both server and client tools), I tried to see what I could do. First I looked to see if there were any OBIEE images (AMIs) out there. There was, but I needed some sort of subscription to that. So I fired up my own Windows Server 2003 (64bit) instance, downloaded java (JDK) and the OBIEE software.
Small side note, download speeds from there are AWESOME!

I have 25 down and 15 up and home and I thought that was fast...we should really feel sorry for Kris.
How to Create an Instance using Amazon's EC2
First you'll need to create an account if you don't already have one. Then go to http://aws.amazon.com/. Find the AWS Management Console and click on that. Should look something like this:

On the lefthand side, you'll see a menu of actions.

On the right side is your dashboard

Back to the left side, choose AMIs

That should take you to this page

Let's find some images.
First, pull down this drop down and select Amazon Images

Then select your platform, Windows

Select the amazon/Windows-Server2003R2-i386-Base-v108

Launch it

This will bring up the Request Instances Wizard, just go ahead and select the default and click on Continue

Instance Details, I don't really know yet what this page is about, perhaps someone out there can enlighten me, but just go ahead and accept the defaults

Now we're on the Create Key Pair page. I have a couple of keys created but I'll walk you through creating a new one as well.

Select Create a new Key Pair

Name your new key "test_key" then select "Create & Download your Key Pair." Download the key to your Desktop.

Next up, Security Group. This is probably what screwed me up previously, trying to connect to Linux instance. I was never sure where the key should reside. I followed all the instructions...I just couldn't get it to work.
With Windows, you need to add a Security Group so that you can RDP into the machine. The port is 3389, but the wizard will take care of that.

Name it whatever you want and down at the bottom, select RDP as the rule you want to add.

When you are done it should look something like this

Select continue and you get this nice little summary page

Click Launch.
Connecting to your Instance
It takes a few minutes for your server to start up. You may have to hit refresh in your management console to see it.
Once the instance has started up, you need to get the password. If you haven't waited long enough, you'll see this:

Be patient.
To retrieve your password go to Instance Actions

You'll be greeted with this

Enter the text from the key you downloaded to your desktop (note the screenshot says obiee_key, that's because I took this screenshot earlier today).

And here's your password

Now open up Remote Desktop Connection (Windows) or your Terminal Server Client (Ubuntu), enter in the address, Administrator for the username and password you just generated.
Hit connect and you should be done!
Saturday, December 26, 2009
VirtualBox: Add Second HDD
Two weeks ago I found a 1 TB external drive for $100, couldn't pass it up. Space was the biggest obstacle in following along in John's EBS series (part IV coming soon).
I had purchased a "small" 320 GB HDD about a month ago, but that effort proved futile because I started to save everything off to that after I upgraded to Karmic Koala and received this lovely message:

Finally, I could install EBS without worrying about space...I created a Dynamically Expanding HDD of 300 GB. I then installed Oracle Enterprise Linux (OEL) 5, Update 4 and loaded as many of the known libraries that I could. Then I began downloaded and unzipping all of the required files. I was doing this in parallel, download the file, unzip, remove the zip file. After about 8 total hours, it was done. The VDI had grown to 68.5 GB.
I then ran the rapidwiz.sh script, navigated through the screens until I got through to the system check. It complained I didn't have enough disk space to install. Of course not...there was only 231.5 GB of space left.
Stupidity followed.
What were my options?
OK, I could extend that VDI to 350 GB...VirtualBox doesn't allow that yet.
But for some reason I couldn't just keep that dynamically expanding VDI, I had to shrink it. How?
zerofree
That would allow me to first zero out the unused space and then use VBoxManage compacthd to shrink it.
That required greater skills than I had though. First of all, you had to mount the root file system in read-only mode. I tried a bunch of different ways and could never get it to work. Looking back, it might be easy(er)...
I then decided to clone the VDI with VBoxManage clonehd thinking (and therein lies the problem) that would do the trick. 12 hours later, I had the cloned VDI. Added it to the Virtual Media Manager but it is just an exact copy of the other one (68.5 used, 300 GB total). Doh.
Enough of this. I'll just add a 350 HD as a Dynamically Expanding primary slave. So I did, booted up OEL and...where is it? Why can't I find it? I guess I have to mount it right?
Instead of researching first, I just start to muck around with the system. Really long story short, I thought it wise to edit /etc/fstab. Upon reboot, it broke. (Shocker)
Amusingly, the root file system was mounted as read-only so I could finally run zerofree.
OK, so I mucked up /etc/fstab, I can fix that right? Just replace my edits with the original...wait, it's a read-only file system.
Twitter to the rescue for the umpteenth time.

Some back and forth with @brad_tumy before finally going to IM.
He pointed me to this link and this command
"Um, Brad, while I have you..."
Do you know how to add a second HDD using VirtualBox? (Yes, I'm really sneaky).
He then pointed me to this link written by the esteemed Mr. Topper. It was kind of hard for me to believe at first, I am not sure I have read a "live" post by Mr. Topper in quite some time. Ah yes, the last post was June 5, 2008.
Brad: "Check out step 12, that's where you should start."
OK, step 12, Create the Partition. This is a VMWare guide, but the concepts are the same. I'm really not sure, but I opened up the Logical Volume Manager (LVM)
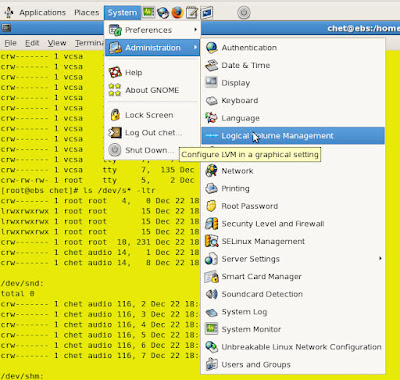
Which opened up this. What's this "Uninitialized Entities" section? I haven't seen that before.

I think I'll click on it.
That looks like my second HDD. Initialize Entity? Sure, why not?
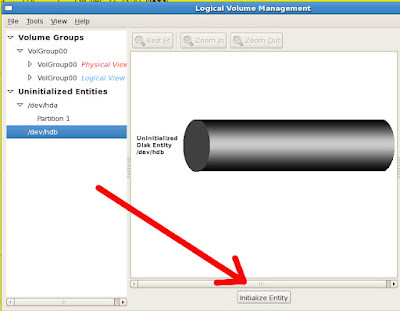
Are you sure you want to initialize this entity? Everything on there will be lost!

Do you want to create a single partition? Are you sure about that?
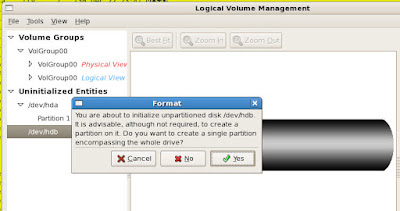
OK, that's done. Now it appears iin the Unallocated Volumes section. Let's create a new Volume Group.

I named it VolumeEBS, I suppose you can name it whatever you want.

Done.
Almost.
How in the hell do I mount this thing?
(Brad is long gone now...we chatted for over an hour into the wee hours of the morning...I can't blame him. He was probably trying to escape after that second question).
Back to Matt's post. Honestly, I have no idea (yet) if this is the same command I performed via the GUI, but I did it anyway after a couple of unsuccessful attempts at mounting the drive.
I added the line (correctly this time) to /etc/fstab, rebooted and it's there.
Now, finally (finally), I can begin my install of EBS. The latest version has probably been released and the instructions are probably moot, but I managed something.
I had purchased a "small" 320 GB HDD about a month ago, but that effort proved futile because I started to save everything off to that after I upgraded to Karmic Koala and received this lovely message:

Finally, I could install EBS without worrying about space...I created a Dynamically Expanding HDD of 300 GB. I then installed Oracle Enterprise Linux (OEL) 5, Update 4 and loaded as many of the known libraries that I could. Then I began downloaded and unzipping all of the required files. I was doing this in parallel, download the file, unzip, remove the zip file. After about 8 total hours, it was done. The VDI had grown to 68.5 GB.
I then ran the rapidwiz.sh script, navigated through the screens until I got through to the system check. It complained I didn't have enough disk space to install. Of course not...there was only 231.5 GB of space left.
Stupidity followed.
What were my options?
OK, I could extend that VDI to 350 GB...VirtualBox doesn't allow that yet.
But for some reason I couldn't just keep that dynamically expanding VDI, I had to shrink it. How?
zerofree
That would allow me to first zero out the unused space and then use VBoxManage compacthd to shrink it.
That required greater skills than I had though. First of all, you had to mount the root file system in read-only mode. I tried a bunch of different ways and could never get it to work. Looking back, it might be easy(er)...
I then decided to clone the VDI with VBoxManage clonehd thinking (and therein lies the problem) that would do the trick. 12 hours later, I had the cloned VDI. Added it to the Virtual Media Manager but it is just an exact copy of the other one (68.5 used, 300 GB total). Doh.
Enough of this. I'll just add a 350 HD as a Dynamically Expanding primary slave. So I did, booted up OEL and...where is it? Why can't I find it? I guess I have to mount it right?
Instead of researching first, I just start to muck around with the system. Really long story short, I thought it wise to edit /etc/fstab. Upon reboot, it broke. (Shocker)
Amusingly, the root file system was mounted as read-only so I could finally run zerofree.
OK, so I mucked up /etc/fstab, I can fix that right? Just replace my edits with the original...wait, it's a read-only file system.
Twitter to the rescue for the umpteenth time.

Some back and forth with @brad_tumy before finally going to IM.
He pointed me to this link and this command
mount -w -o remount /Worked! I could now edit the file and get my system back up and running.
"Um, Brad, while I have you..."
Do you know how to add a second HDD using VirtualBox? (Yes, I'm really sneaky).
He then pointed me to this link written by the esteemed Mr. Topper. It was kind of hard for me to believe at first, I am not sure I have read a "live" post by Mr. Topper in quite some time. Ah yes, the last post was June 5, 2008.
Brad: "Check out step 12, that's where you should start."
OK, step 12, Create the Partition. This is a VMWare guide, but the concepts are the same. I'm really not sure, but I opened up the Logical Volume Manager (LVM)

Which opened up this. What's this "Uninitialized Entities" section? I haven't seen that before.

I think I'll click on it.
That looks like my second HDD. Initialize Entity? Sure, why not?

Are you sure you want to initialize this entity? Everything on there will be lost!

Do you want to create a single partition? Are you sure about that?

OK, that's done. Now it appears iin the Unallocated Volumes section. Let's create a new Volume Group.

I named it VolumeEBS, I suppose you can name it whatever you want.

Done.
Almost.
How in the hell do I mount this thing?
(Brad is long gone now...we chatted for over an hour into the wee hours of the morning...I can't blame him. He was probably trying to escape after that second question).
Back to Matt's post. Honestly, I have no idea (yet) if this is the same command I performed via the GUI, but I did it anyway after a couple of unsuccessful attempts at mounting the drive.
[root@ebs chet]# /sbin/mkfs -t ext3 /dev/hdb1Something good happened...I think.
mke2fs 1.39 (29-May-2006)
Filesystem label=
OS type: Linux
Block size=4096 (log=2)
Fragment size=4096 (log=2)
39321600 inodes, 78643199 blocks
3932159 blocks (5.00%) reserved for the super user
First data block=0
Maximum filesystem blocks=0
2400 block groups
32768 blocks per group, 32768 fragments per group
16384 inodes per group
Superblock backups stored on blocks:
32768, 98304, 163840, 229376, 294912, 819200, 884736, 1605632, 2654208,
4096000, 7962624, 11239424, 20480000, 23887872, 71663616
Writing inode tables: done
Creating journal (32768 blocks): done
Writing superblocks and filesystem accounting information: done
This filesystem will be automatically checked every 39 mounts or
180 days, whichever comes first. Use tune2fs -c or -i to override.
[root@ebs chet]# mount -t ext3 /dev/hdb1 /installWin! Or is that FAIL!? I don't care. It's done.
[root@ebs chet]# ls /install
lost+found
I added the line (correctly this time) to /etc/fstab, rebooted and it's there.
Now, finally (finally), I can begin my install of EBS. The latest version has probably been released and the instructions are probably moot, but I managed something.
Subscribe to:
Posts (Atom)
